 |
Les Costumes - Cotte de Maille 6-1
|
|
|
|
Les Costumes - Cotte de Maille 6-1
|
|

Step 2
Allow the two upper side rings to fall to the sides and flip the
lower ring assembly as indicated.
Step 3
Spread the starting assembly in the arrangement shown above and
identify the first ring with a paper clip or piece of string and/or a
radioactive tracer. The apprentice will note that the paper clip in the above
drawing is shown without the radioactive tracer.
(It would glow)

Step 5
The apprentice should note the gaps between the white rings at the
arrows. The upper center ring must be opened and slipped through the lower
adjacent side rings. Note how this completes the 6-in-1 pattern for the center
ring. Continue adding ring assemblies in the above manner until the desired
length is reached.

Step 7
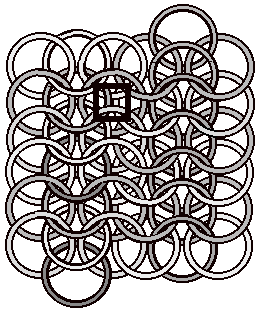
With the side rings
attached as shown, note in the black square, and subsequent sites, that the
center ring is not attached on the upper right side. The right side ring should
be going over the upper middle ring and under the lower middle ring like its
neighbor to the left. This attachment is most easily viewed and completed by
turning the piece over as shown in the following illustration.

Step 8
With the piece turned
over, the attachment sites are more accessible. With the attachments made, as
shown in the square, the linkage is symmetrical and complete. Make your armor!